We’ve all been there: exhausted after weeks or even months of job searching, hundreds of applications, innumerous challenges, and countless rounds of interviews, you finally land your new job. And right away, you find yourself in the thick of things, disoriented, overwhelmed, struggling to get the hang of what’s going on.
Being a new team member is hard as is; it’s even harder if the company hasn’t put the onboarding process on the rails. But even if they have, there’s still a risk to miss out on something and discover it only weeks or months later, often when an employee shows underperformance and demotivation.
When leaving one of my first workplaces, in hindsight, I saw the shortcomings of the onboarding process that hindered my performance and overall integration. So I developed a routine and a set of checklists to support myself during my first days at a new job. And I’m happy to share them with you so that your onboarding goes smoothly.
This article may come in handy not only for UX Writers, but for other members of UX teams as well as managers and team leaders with a new UX Writer on their team or thinking of hiring one.
Part one: Environment
The first part of the article is related to the basic setup of your workplace: having everything you need at hand, knowing who to ask and where to go.
It’s better to get this figured out in the first 3-4 days so that you’re fully armed to delve into the product and work in general.
Step 1: Documents and other official stuff
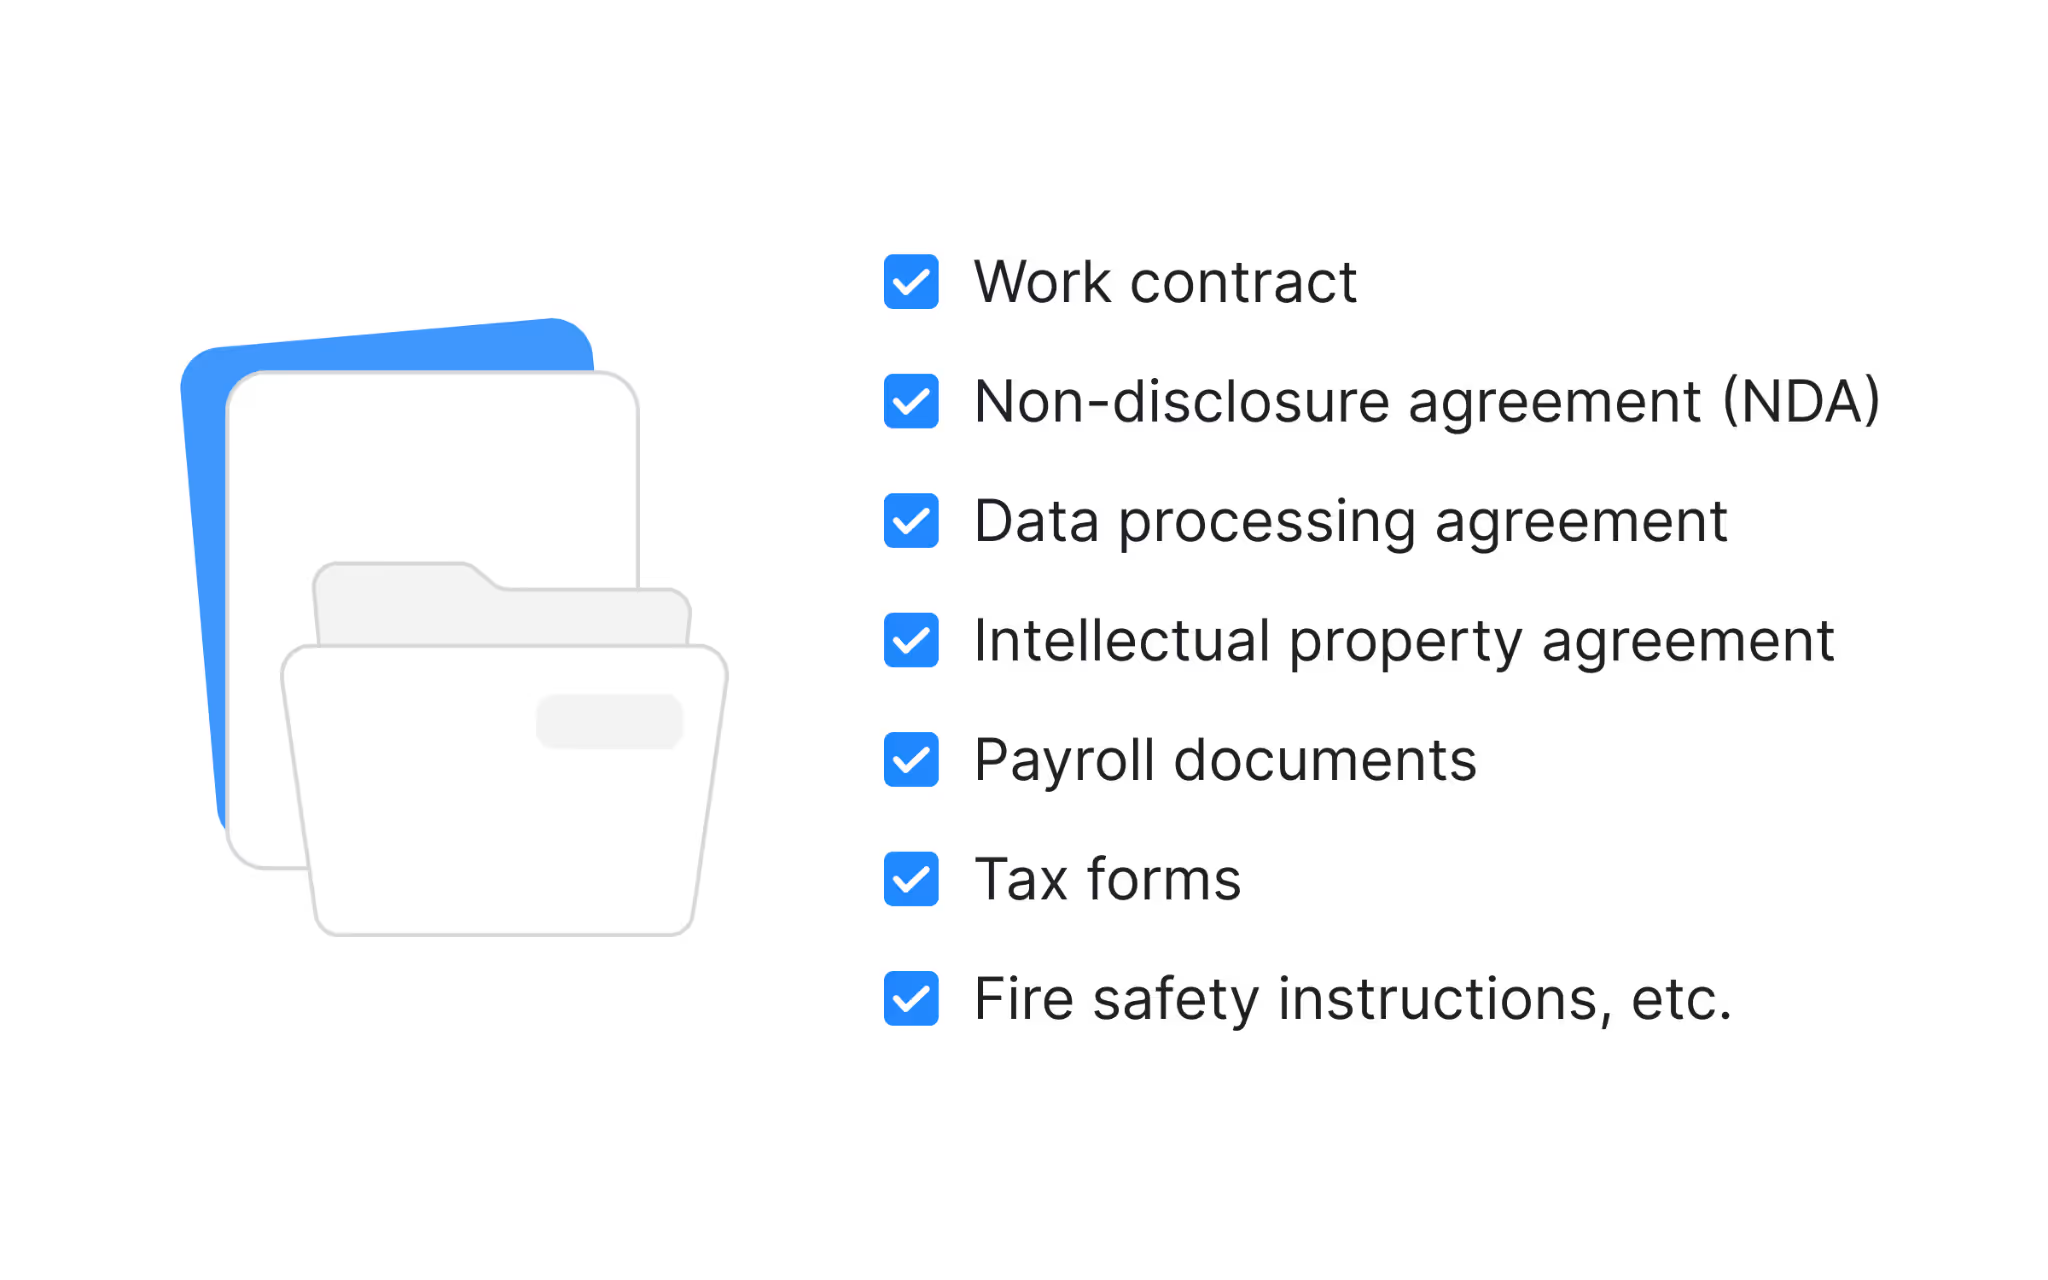
The first thing you’ll need to do at your new workplace is to sign documents. These may include:
- work contract;
- non-disclosure agreement (NDA);
- data processing agreement;
- intellectual property agreement;
- payroll documents (bank account details, etc.);
- tax forms;
- fire safety instructions, etc.
If you’re an HR, it’s a good practice to send all the documents in advance (if possible) so that a new employee can look through them properly and discuss all the matters right off the bat. What’s more, it will help avoid wasting time and not to overload an employee during their first day (they’ll have a lot on their plate as is).
Step 2: Office
If you're supposed to work onsite, you need to get familiar with your new workplace, not only your desk. If you're on a hybrid schedule, you'll still need to know where to sit on the days you're in the office. You may want to clarify if you have a fixed desk or if you'll be using a shared workspace, and check if there are attendance requirements to secure a spot (Sheldon Cooper vibes, anyone?).
Apart from your desk, you may want to know where to find:
- printers, stationery supplies like paper and pens, etc.;
- medical kit;
- relax zones, lockers for personal belongings, gym, or shower if available.
You may also want to know where the following specialists are located:
- tech support (in case you need help with your devices);
- HR managers;
- accountants;
- office managers.
Additionally, make sure you get:
- your office pass;
- parking permit (if needed);
- meal or lunch card.
If you're an HR, team leader, or a colleague, offering a tour or grabbing a coffee together can be a nice way to help new hires feel welcome and build informal connections.
Step 3: Equipment and other tech stuff
Ensure you have all the necessary tech equipment. Typically, this includes:
- a laptop;
- a headset;
- a monitor (if needed);
- a computer mouse (if needed).
Some companies provide a full setup including a desk or fancy ergonomic chairs, particularly for those working remotely or on a hybrid schedule. Check if your new workplace offers such perks (especially if you’re already in your thirties, you want to avoid shrimp posture and other job-in-tech-related injuries).
Normally, you’ll be asked to sign a monetary responsibility agreement for the equipment.
It’s also helpful to clarify in what situations you need to return your equipment (e.g. if you're planning to work from another country or switch to an office in a different location).
Additionally, it's a good idea to learn where test devices, such as smartphones, tablets, or other gadgets, are stored. In some companies, there’s a designated area or a shared box with devices that can be borrowed by anyone on the team. In some cases, you may ask your tech support team to provide you with one. But in most cases, you’ll need to collaborate with your QA engineers to access the devices. It's better to decide up top when you can borrow the devices to not hinder the development process.
Step 4: Accesses
Getting access to the necessary resources can be a real pain point and may end up eating into several days of your time.
Usually, once you’ve got your work laptop, you’ll receive a login and password for your work account, which will get you into your corporate email and messenger. But, of course, that’s just the beginning.
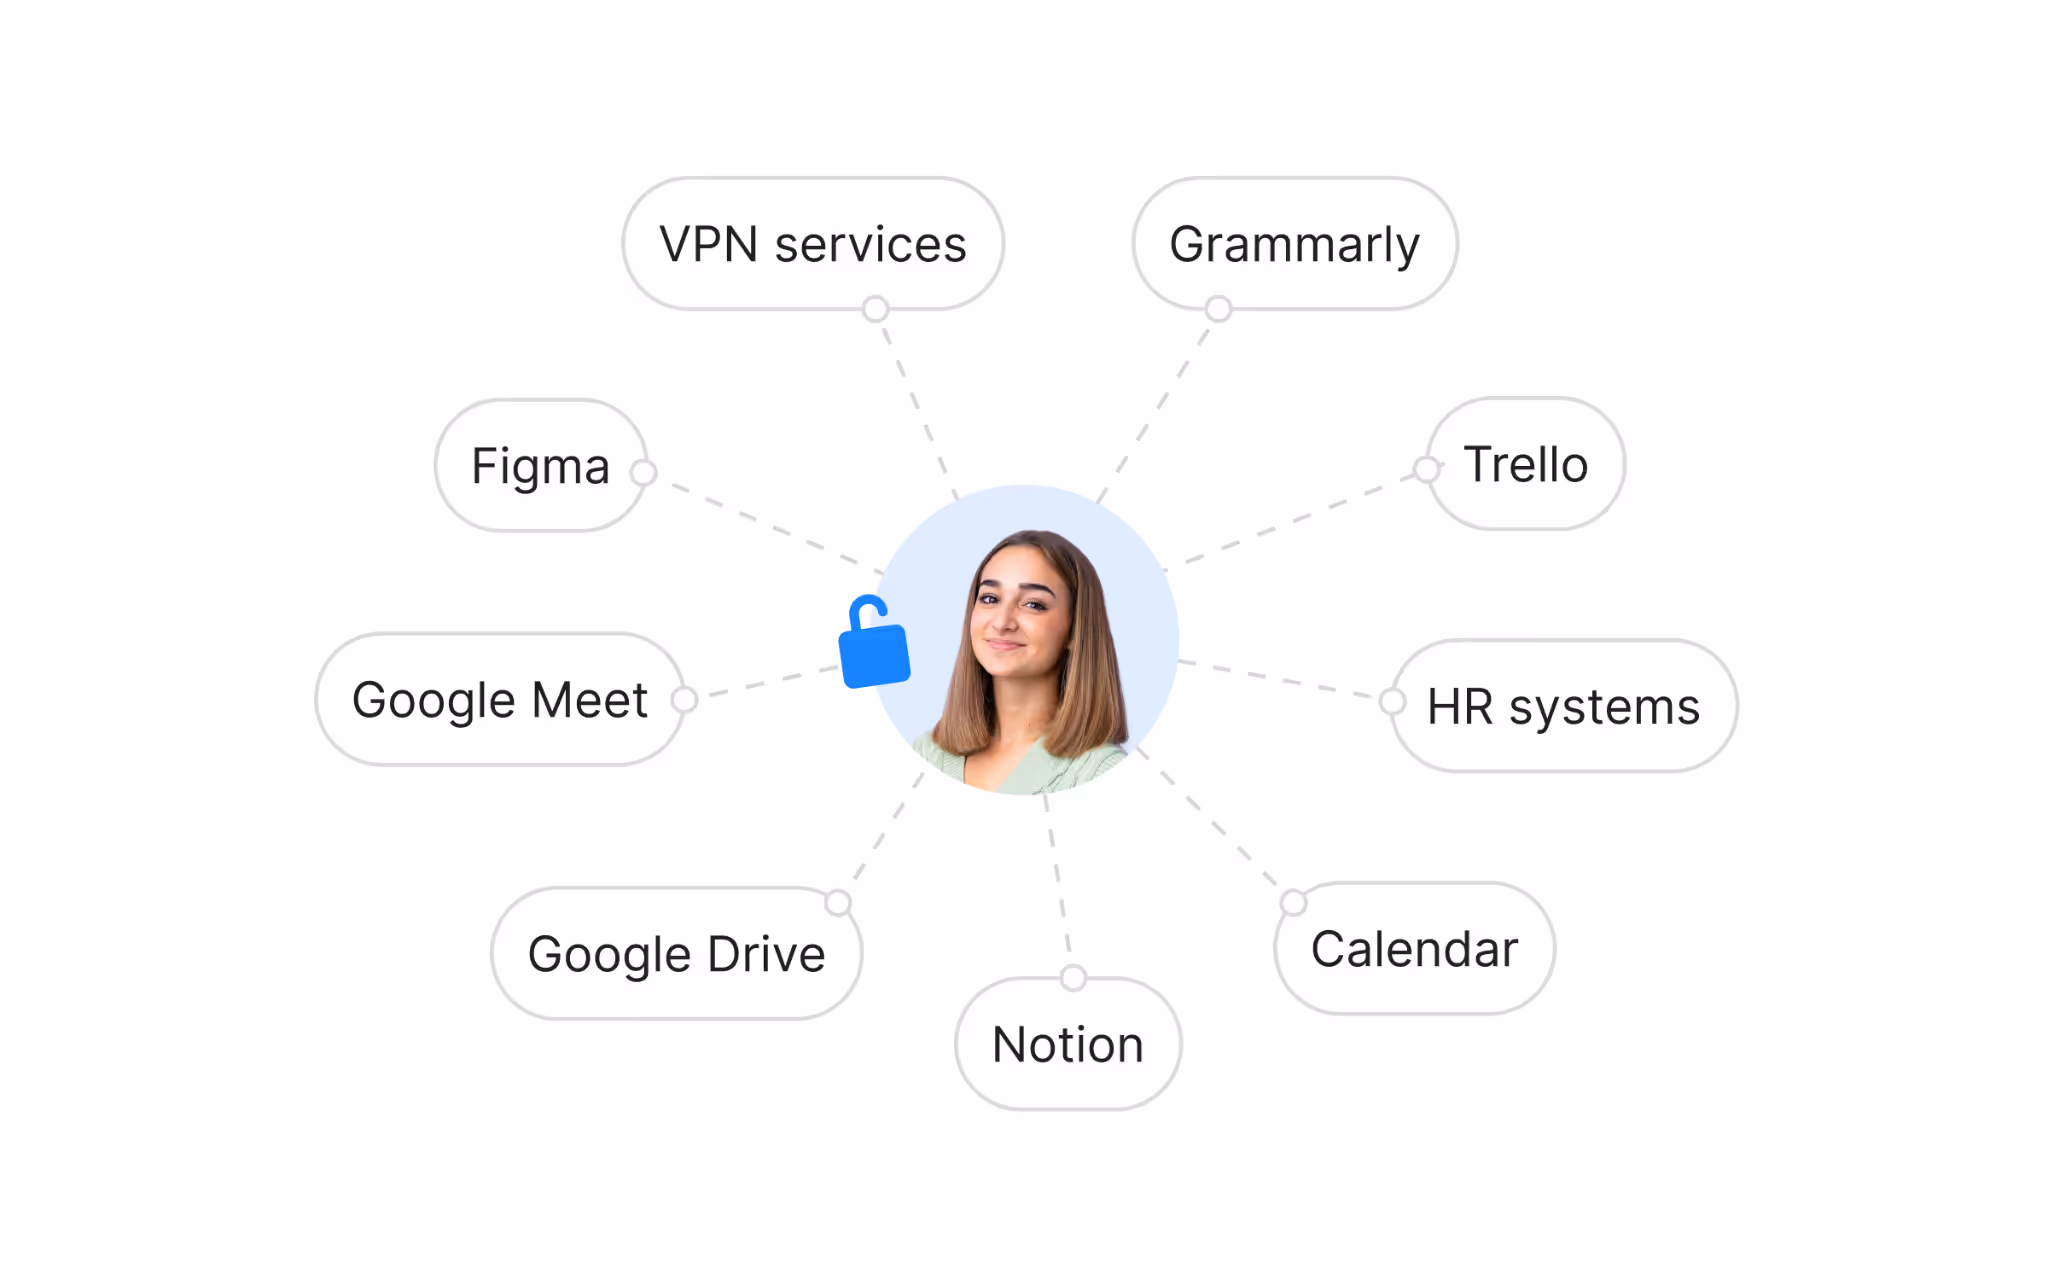
Figure out the full list of services and tools you'll need for your daily work. These might include:
- calendar or other booking services;
- task trackers (Trello, Jira, Asana or similar, with access to your team’s boards);
- knowledge bases (Confluence, Notion or similar, with access to your team’s or other related spaces);
- video communication platforms (Zoom, Google Meet, etc.);
- graphic editors and design tools (Figma, with editor access);
- data storage (Google Drive folders or internal services);
- VPN services;
- CMS systems, localization platforms, or other workflow tools;
- writing assistance tools like Grammarly;
- HR systems for managing personal or payroll information.
Make sure you’ve got all the tools you need installed or know who to contact if something’s missing. If you need additional tools, find out if there’s a whitelist or blacklist of software.
Ensure you have access not just to the tool but to all the boards, spaces, or files of the teams you’ll be working with.
Make sure to clarify the level of access or role you need to perform your work. For example, in some tools, the role of a contributor will be more than enough. But to perform tasks in other tools, you’ll need an admin role. The person granting access may not know or care about it, and if you don't get the right permissions, you could end up facing the same frustrating errors over and over.
I learned this the hard way with Weblate, a localization tool. At first, I thought there was no possibility to add context or screenshots to the string. It drove me crazy; how could someone even design such a useless platform, I thought. Turns out, I just needed project manager access. Once I got it, it brought a spark to our relationship.
Some companies have quotas for paid plans and won’t automatically give you access to premium features. But if you need them, don’t hesitate to ask if you can upgrade your work account, whether it’s Zoom, ChatGPT, or any other tool.
Get access to a test account for the product you’ll be working on. You’ll probably need credentials and/or some tools such as Appsflyer.
Clarify how to request accesses. Some companies have a centralized system, a bot, or a help desk channel to streamline requests. In other cases, you might need to email a specific department or ask a coworker for assistance. Keep in mind that some requests may require several layers of approval, so it’s a good idea to submit those early on to avoid delays.
If you're an HR or a team leader, request all the accesses for your new hire in advance, if your company’s policy allows.
Step 5: Documentation and resources
As a UX Writer, you’ll need to familiarize yourself with:
- content design system (if it exists);
- general content and style guidelines;
- voice and tone guidelines;
- glossaries.
It will also be nice to take a look at:
- instructions and workflow descriptions (e.g., if you need to check with lawyers and PR when writing some types of texts);
- information about the product (e.g. knowledge base for support agents);
- content and style guidelines of related departments (marketing, etc.);
- sphere-specific guidelines (e.g., for fintech services, you might want to see marketing and advertising memos issued by regulatory authorities).
If you're a team leader or a colleague, it’s a nice practice to create a playbook or even a course for newcomers including all the necessary onboarding info in one place, with a comprehensive sequence of actions outlined. Additionally, you can meet in person to explain how things work or run through guidelines and instructions together in case some docs have lost relevance or a newcomer has questions but is too shy to ask.
Step 6: People

The first people you get to know are your HR and hiring manager (typically, you meet them during job interviews).
But depending on the structure of the company, you may have several managers. For example, in a matrix organizational structure, you will have a department head and a project manager (or several).
There may be several HR people too: for example, a talent acquisition manager, an HR Business Partner, etc.
Typically, during your trial period, you’ll primarily communicate with your HR manager and, depending on the company’s size and headcount, either your hiring manager or a dedicated onboarding partner, usually a fellow Content Designer. You can direct all your questions to them. Questions about tasks, teams, processes, workload distribution, career advancement, and similar topics go to your manager. For questions about vacations, sick leave, healthcare plans, perks, and related matters, reach out to your HR manager.
And, of course, make sure to get acquainted with all the teammates you’ll be working side by side with on a daily basis. These usually include:
- UX/UI Designers;
- Software Engineers (frontend, backend, iOS, Android);
- QA Engineers;
- Analysts;
- UX Researchers.
It’s a good idea to learn who their functional leads are, just in case you need clarification about their expertise, work standards, or a second opinion.
Occasionally, you’ll have to work in collaboration with colleagues outside your team, so it's worth getting to know these people right away, too. For example, you're a product copywriter and one of your tasks is to write trigger emails. You might want to connect with the email marketer and layout designer, if available. Here’s a list of key roles you might want to acquaint yourself with:
- CRM/email marketing managers and copywriters;
- marketing managers;
- content marketing managers;
- heads of support;
- localization team (if you work on an international product);
- legal team;
- compliance officers (in FinTech).
If you’re a team leader or a colleague, arrange an intro call with useful people outside of the team or provide a list of these key contacts along with their titles and a brief description of how they can help.
Step 7: Communication
We all know how exhausting meetings can be, but during your first weeks, it’s crucial to dive into everything. Teams often forget to include a Content Designer in some meetings, so it’s better to deal with a calendar jam-packed with Zoom calls now than to see new designs shipped without you even having taken a look at the copy.
Here’s where you’ll want to show up:
- team rituals such as dailies, retrospectives, sprint and quarterly planning, backlog refinement, etc.;
- department/community meetings (with other Content Designers or peer writers);
- company-level activities (e.g. meetings about quarterly or annual results and strategy);
- one-on-ones with your manager (regularly or on demand; at least once every two months);
- informal or HR-hosted activities like workshops, TED Talk-style sessions, or team-building events;
- educational activities.
Make sure you’ve been added to the right mailing lists and chats, such as:
- team chats for day-to-day communication;
- project-specific chats for collaboration on tasks;
- official announcement channels for company-wide updates;
- office announcements (if you work onsite);
- HR channels covering topics like healthcare plans, office meals, or internal vacancies.
Don’t be shy about joining off-topic and thematic chats or channels, like one for sharing pet photos (I have one from my previous workplace and this is SO therapeutic). These spaces help you connect with the team on a personal level, making it easier to settle in and feel part of the group.
Managers may not add you to some activities, such as dailies or technical discussions, because “there will be only tech stuff, don’t bother.” Explain that it's important for you to be part of the team, to be in the context of common work, to maintain a culture of openness, and to understand the product and processes as well as possible in order to deliver the best results.
Now that you’re set up, it’s time to get to work!
Part two: Process
This part is about how to live through your trial period: proving your worth to bosses and colleagues, immersing yourself in a new environment, approaching initial tasks smoothly, and delivering your first results. Essentially, it’s about how to shift from surviving to thriving.
Getting the hang of it all, or the rookie indulgence
In the early stages, ask as many questions as possible. This will help you quickly learn the product, processes, and the right people to go to for help. Everyone expects a newcomer to ask lots of questions, even the "silly" ones, and they’ll generally be happy to help. I like to call this the “rookie indulgence.” Take full advantage of it while you can! After three months, six months, or especially after a year, it can feel awkward to ask questions you could’ve addressed early on.
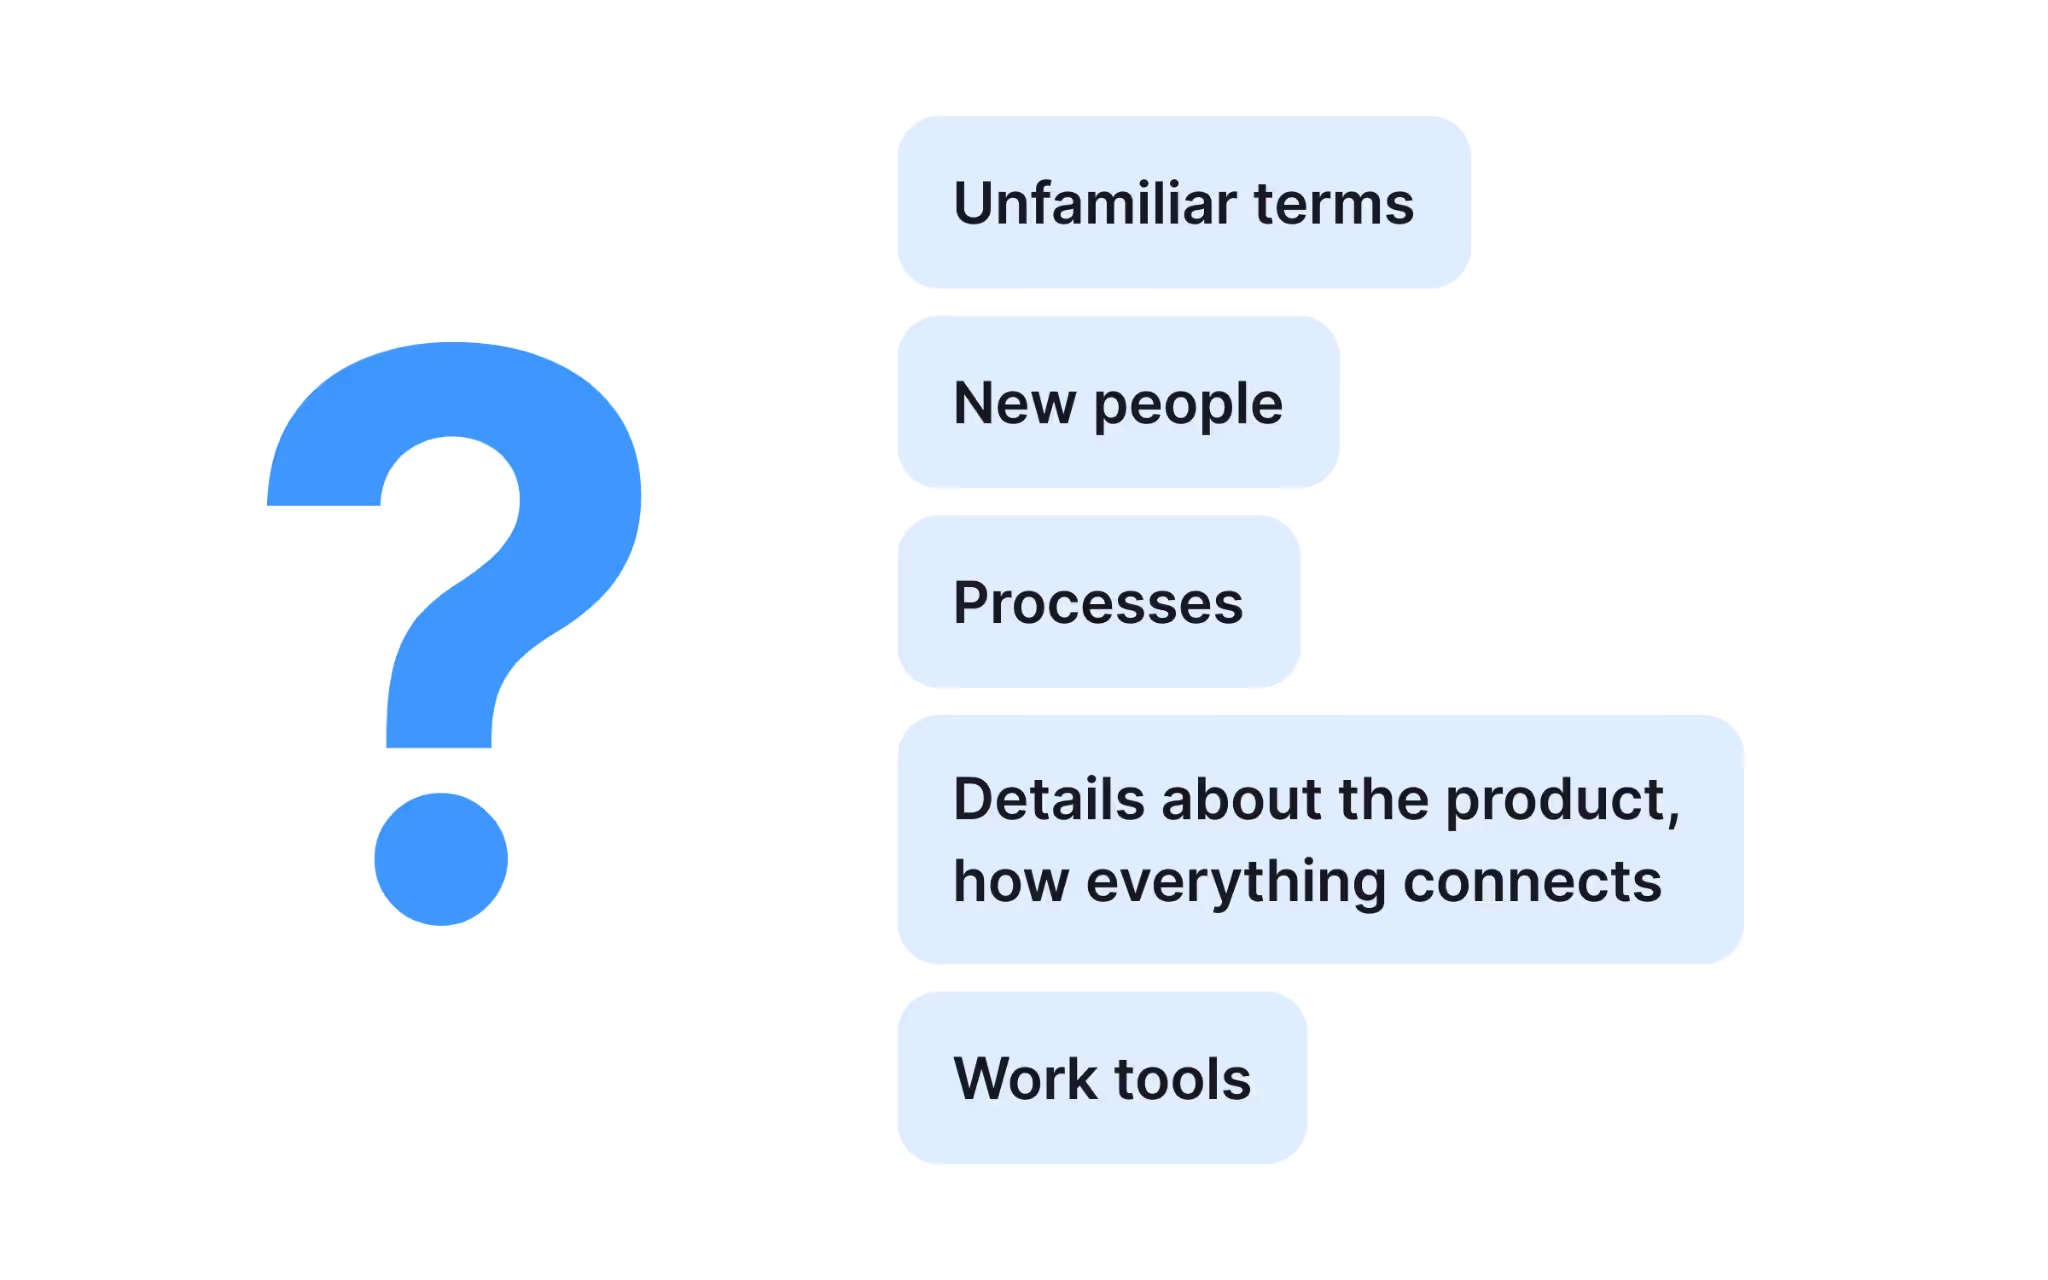
Here's what you should ask about:
- unfamiliar terms;
- new people;
- processes;
- details about the product and how everything connects;
- work tools.
Organize your questions into groups. For example, “design,” “product,” “company,” “general.”
Or you can divide all the questions into groups depending on who you’re going to address them to. For example, questions about design processes, navigating Figma files, etc. should go to your fellow UX/UI designers. Questions about product strategy, past experiments and research most probably go to your product manager.
Let your questions “brew” a little before asking. Sometimes the answer is in the next section of the documentation, or you might notice that some questions cluster around one topic. Asking these as a group can give you a more systematic understanding. But don’t let your questions sit on the back burner too long: otherwise, you risk forgetting important details or might decide to leave some things as is unclarified. Plus, you want to show up as a proactive person.
Don’t overuse your colleagues’ time and attention. Before asking a question, check if they’re comfortable or have time to help. Make it clear that it’s perfectly fine for them to say no, and be calm and understanding if they do. If they can’t help, ask if they can direct you to someone who can.
If you’re a team leader or an onboarding partner, it might be a good idea to organize a series of regular meetings to give your newbie a comprehensive walkthrough of the product and the company. Each meeting could be devoted to one topic, such as product overview, design and development process, market overview, goals, or the company org structure.
Meeting people
At my last two jobs, I scheduled 15-minute one-on-one calls with the designers and others I’d be working with to understand how they preferred to collaborate. I’ve realized I’m not a particularly quick thinker, so working on designs "on the fly" isn’t my strongest suit. I need to concentrate and reflect deeply to come up with something meaningful; it takes time. I also don’t like it when someone’s constantly hovering over me, and I’m not a fan of showing drafts (you know, when it’s a draft-draft, not yet a decent work iteration).
And I found out that many people felt the same way and they really appreciated this "how can we best work together?" approach; it resulted in a fruitful collaboration. So I believe it’s better to discuss such matters up top rather than spending tons of time trying to get by through trial-and-error. It’s all about respecting each other and each other’s working styles.
Here’s more proof that this is the best way to collaborate and people really appreciate it. One day, a chat with my former colleagues drew my attention: they were discussing a new team member there. I took a peek and here’s what I saw (to my delight):
A: So, this cool new product manager popped up in our chats. She set up this kind of... meeting-intro thing with me. She asked how I’d feel most comfortable working with her, told me about herself, what she can handle. Oh, and then she asked how I feel about dark humor. Total crush moment.
B: I wonder where she came from?
C: Straight down from heaven, obviously.
So I got something else that proves I'm on the right path (and maybe a few steps closer to being this “colleague from heaven”).
Approaching first tasks
Ideally, during your onboarding, you should always know what to focus on, there’s already enough on your plate without having to guess which end of the rope to grab.
To keep things clear, make sure you have a list of specific tasks for your trial period. You can create a table, an Excel sheet, or put your tasks into a calendar or some CMS, whatever works for you.
At a minimum, make sure this information is recorded somewhere,however informally, so you have clear expectations. This will help avoid awkward situations at the end of your trial period where someone says, “Oh, we were expecting you to do this, this, and that and generally to take the initiative.”
Let’s imagine the opposite scenario: you’re in the middle of a perfect storm, the first writer on the team, and things are moving fast.
It might feel natural to dive into the most burning text issue. But sometimes, it’s better to let it burn than to rush in without a deep understanding: you risk doing a really, really bad job this way.
A good starting point is to figure out the sprints and release schedule. That will be your system of coordinates. From there, you can set key points for your work, such as:
- start of the feature development (you want to have all texts finalized and approved by this stage);
- regression testing (be ready to address layout issues or other fixes. For international products, ensure all localizations are prepared);
- sending the app build to the store (if you’re the one who writes release notes, you want to have them ready).
Use your task tracker to see when the designs currently in development were finalized. There’s likely a gap of one or two sprints. This will help you understand the workflow, for example, you might be contributing to designs now, but they probably won’t enter development for another couple of sprints.
Here are some ways to figure out where to step in and which tasks to focus on:
- Talk to the product manager about development plans for the next sprint or two. You’ll likely want to review the copy on designs before they’re handed off to devs.
- Check in with your designers about what they’re working on right now and what’s coming up next. That’s probably where you’ll want to jump in.
- Explore the dev team’s task tracker for the current and upcoming sprints. Look for tasks that might need text, find the assignee, and reach out to them for details.
- Review the backlog and start following tasks related to the design and development of new features, as well as bugs that seem text-related.
If you’re a team leader or an onboarding partner, create a task in the tracker, something simple like “Get acquainted with the product”, to guide a newcomer. This gives them something to share progress on during daily meetings, helps them feel included, and reassures them they’re part of the team instead of feeling adrift.
Getting familiar with tools
It’s better to try something hands-on once than to watch or read a million tutorials. Even better if an experienced colleague can guide you through it.
How can you organize this most effectively? When tackling a task that requires using a specific tool, let your onboarding partner know in advance. Ask for a call where they can walk you through the tool, show you how to perform the task, and then give you the chance to replicate it yourself.
For example, if you’re expected to work with a localization tool, once your designs and copy are ready, you can ask your onboarding partner to walk you through your translation management system (TMS). They might show you how to create a new string, fill in the source language and other properties, and pass it on for translation. Then, for the next string, you try it yourself while your onboarding partner supervises.
Thus, you’ll get practical, hands-on experience in a controlled, safe environment. Plus, it gives your onboarding partner the chance to spot any issues, like missing access permissions, right away.
If you’re an onboarding partner, schedule a meeting to give a walkthrough of the tool. You might also consider creating a task for a newcomer in the task tracker (for the same reasons as mentioned above).
Seeing the bigger picture
Once you start feeling familiar and comfortable with your work and tasks, take a step back and look at the bigger picture. How does your work impact the people around you? How does your piece fit into the larger process?
Let’s say you have a task to create an email to inform users about a new feature. Don’t just focus on writing the text, header, and preheader; try to understand how sending emails works in your workplace: what tool is used, who manages the process, the guidelines for that, if there’s a folder to store all the email copy and templates, and so on.
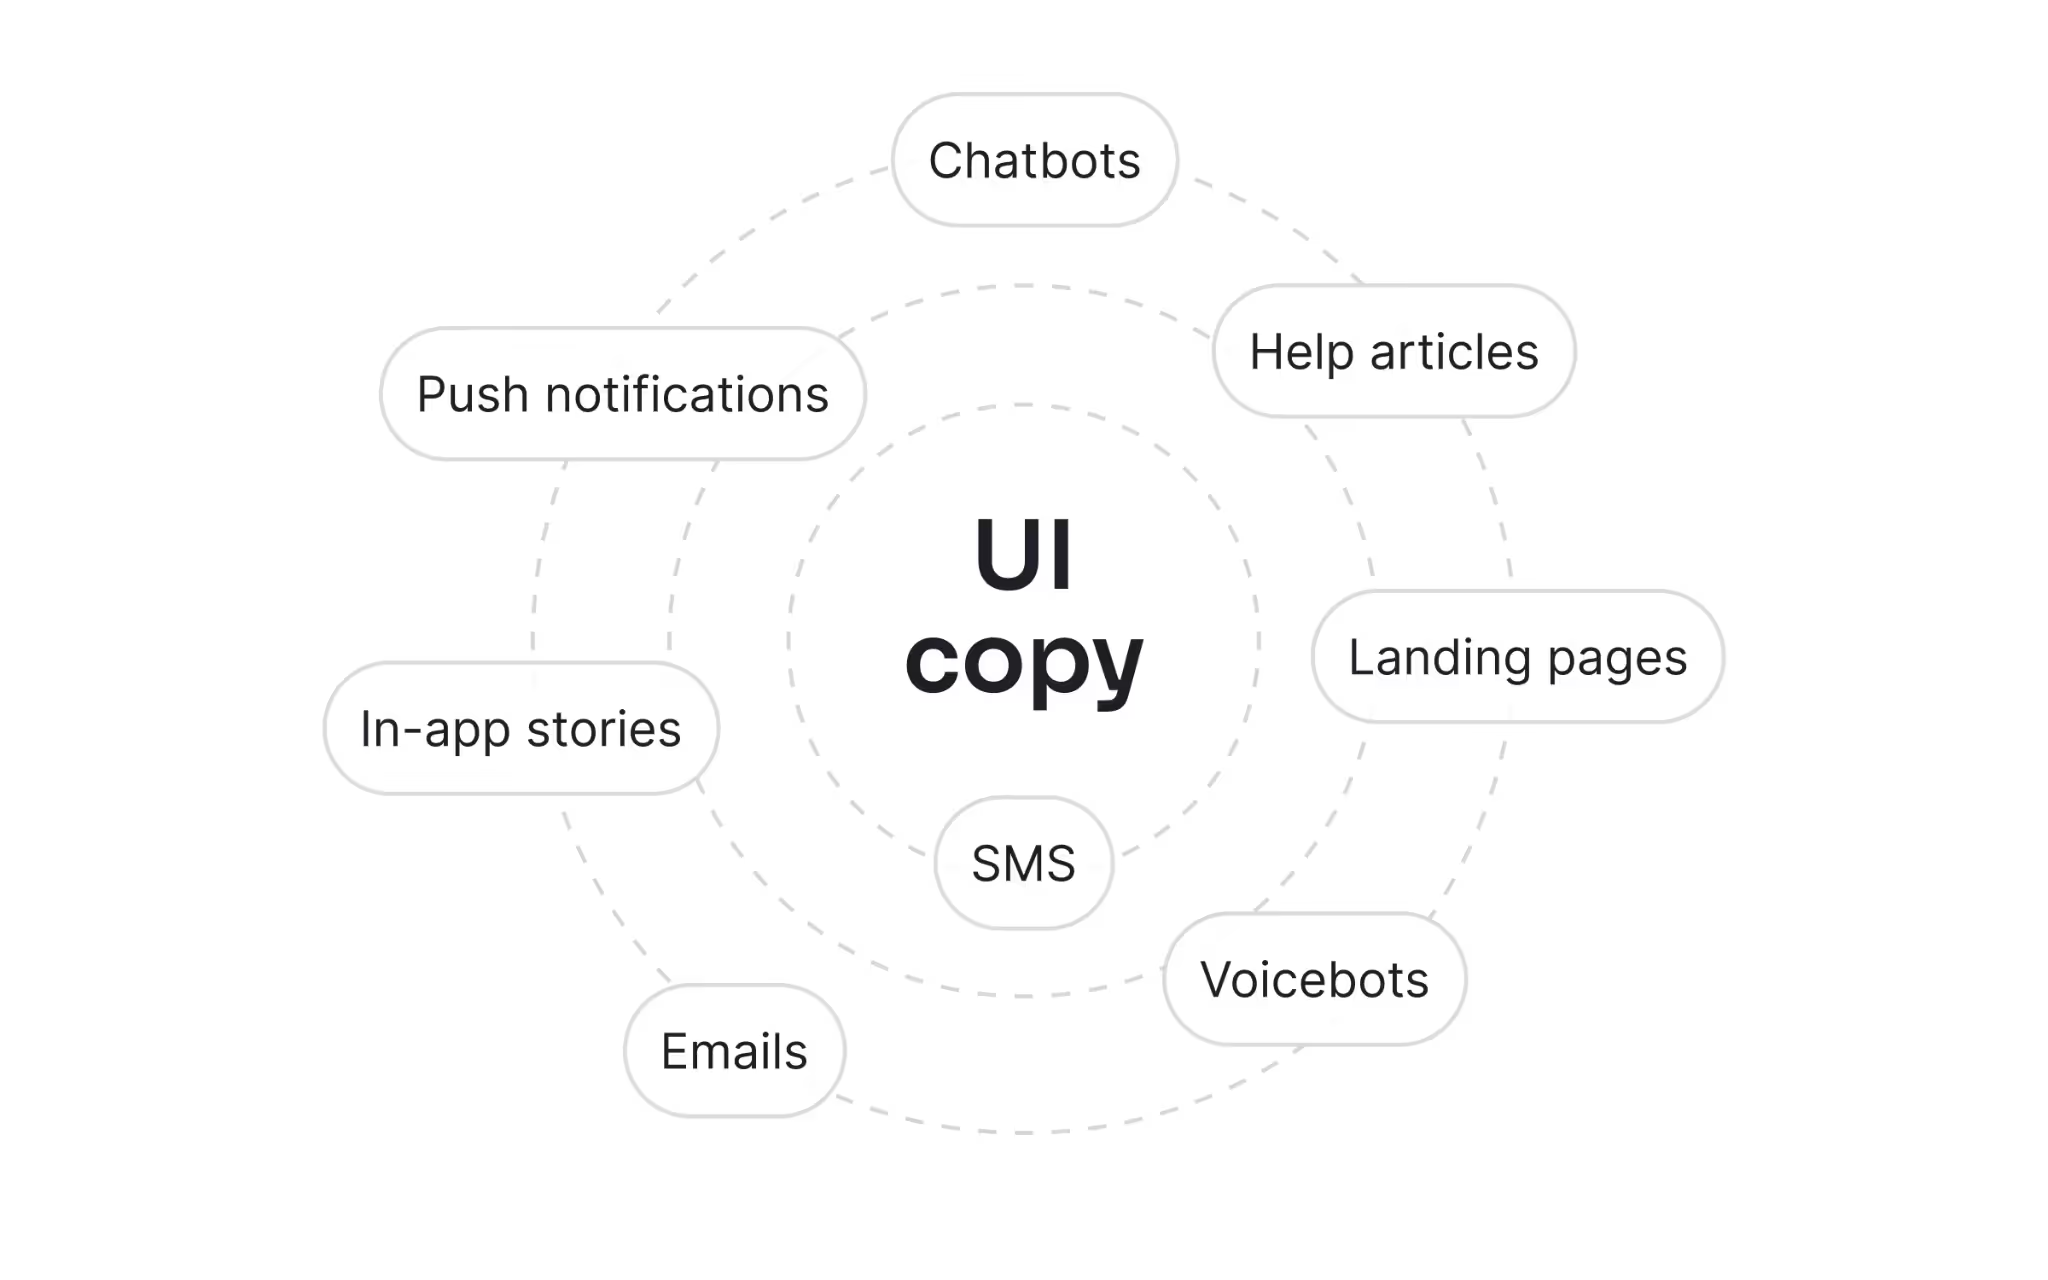
As a UX Writer, you’ll want to connect the dots between UI copy and:
- emails;
- push notifications;
- SMS;
- in-app stories (if you have them);
- landing pages;
- help articles;
- chatbots and voicebots.
Understanding these connections will help you do your own job better, streamline overall processes for everyone, and find opportunities for collaboration.
Part three: Progress tracking and milestones
Even if you’re not a fan of planning, writing things down, or journaling, I strongly recommend you do so, at least during your first few weeks. You’re overloaded with new information and likely feeling stressed out, so you can’t remember everything. And you need some headspace. Plus, if something goes wrong, you’ll have somewhat of a “black box” that tracks what went off course.
Regular practice: Daily planning and health check
Writing down everything you’ve planned for the day, and what you’ve accomplished—isn’t just about time management. When you’re bombarded with new information but haven’t completed many tasks, it’s easy to feel like you’re not doing enough. And your imposter syndrome will feed on it. But the truth is, you’re doing a lot, and keeping track helps you see it clearly.
Here’s my approach. I keep a simple Google Doc with a list of planned activities. In the beginning, I include all the details such as links, Slack nicknames, etc. (the more detailed, the better). I even list small tasks like “ask Ann how to get access to tool X” or “order lunches for next week.”
As you start getting the hang of things and feel more comfortable, you can streamline your list to include only the most meaningful tasks.
For example, here’s how my to-do list looked during my first week:
- Newcomer’s course Chapter 1 take test [link]
- Agree with Greg @greg.the.colleague on the team day in the office
- Daily meeting
- Ask Alex @alex.the.designer how to get editor’s access to Figma
- Create a signature in work Gmail
- Meeting on typography guidelines
- Find out about access to TMS [link to TMS]
- Meeting on hypothesis for UX research [link to documentation]
- Study UX writing guidelines [link]
And here’s what it looked like after three months (not because I was doing less work, just because I no longer needed to track every little task):
- Ask backend devs about the error
- Finalize tooltip
- Designs for feature X
I color-code tasks: the ones done are green, the ones partially done (or at least started) are yellow. I avoid using red: seeing lots of red lines in the to-do list increases anxiety. So if the task isn’t even started, I usually leave it uncolored. Unless it’s a critical one, then it’s red.
This approach works better for me than just crossing tasks off or marking them with a check. The latter can make you second-guess yourself: “Can I really call this task done if there’s still this or that left to do?” Plus, crossing off unfinished tasks might make you miss important details.
On the other hand, if you don’t cross out incomplete tasks and keep transferring them day after day, you’ll end up with a cluttered list and the feeling that nothing ever gets done. Color-coding keeps things clear and helps you feel more confident and productive.
If a new task comes up during the day and isn’t urgent, I write it down for the next day or later, especially if it’s blocked by someone’s vacation or illness.
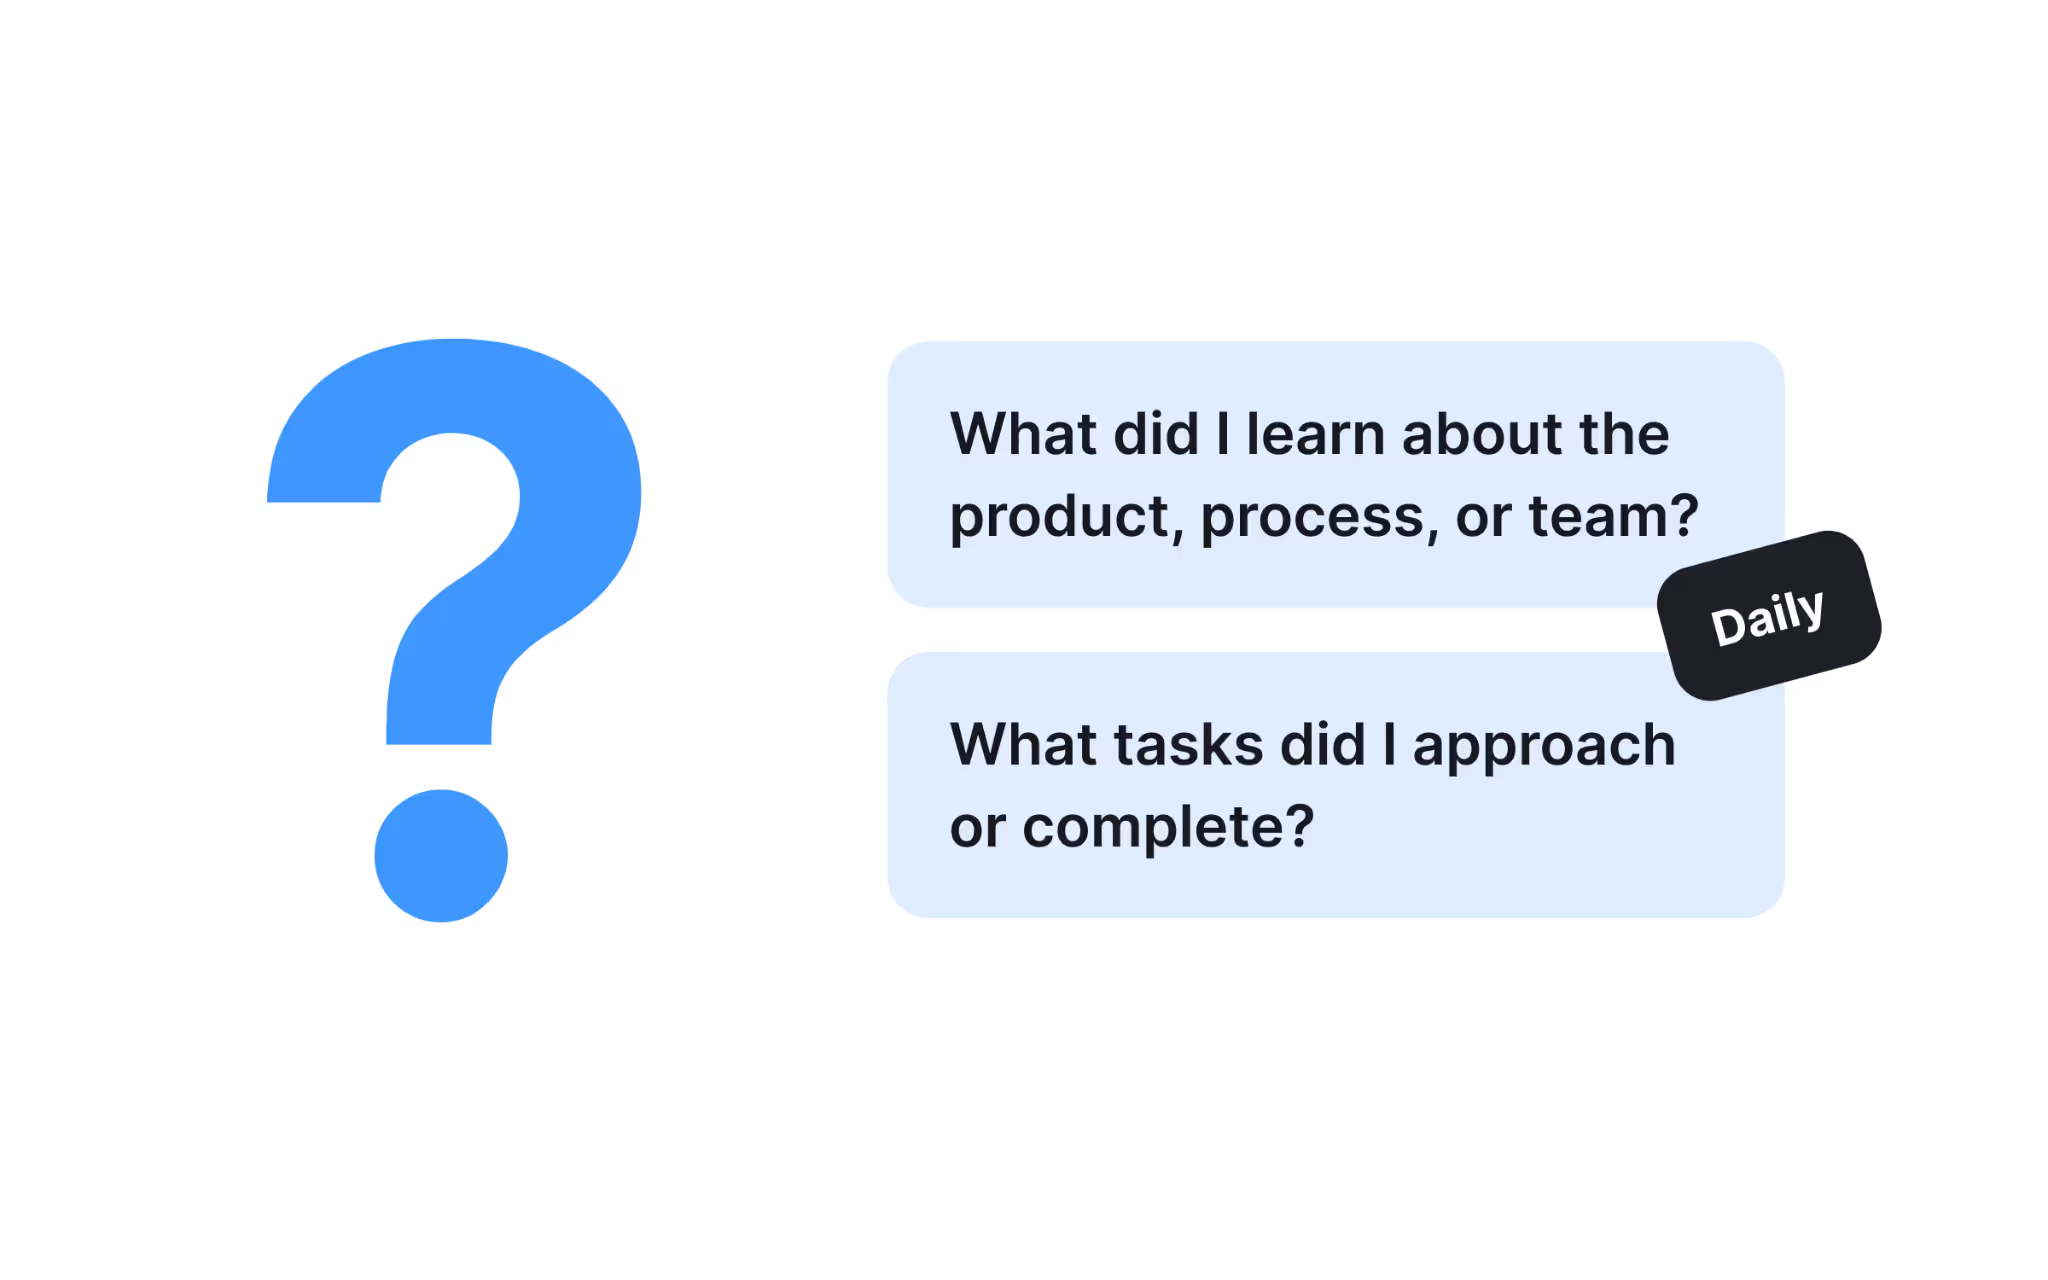
At the end of each day, take five minutes to review your progress and plan for tomorrow: transfer, modify, or break down any incomplete tasks. Also, ask yourself two questions:
- What did I learn about the product, process, or team?
- What tasks did I approach or complete?
Every day, you’re learning something and making progress, even if it’s hard to notice because of all the new information coming at you. This simple practice will help you stay aware of your professional growth during onboarding.
Regular practice: Weekly health check
Think of this as a bigger version of your daily health checks. It gives you a bird’s-eye view of what you’ve accomplished, helps you step back from the daily grind, and offers a fresh perspective. You can see the bigger picture, track your impact, and even notice trends over time.
In just a couple of weeks, you might realize a whole new feature has been shipped, and it’s something you can add to your portfolio (which we often forget to do, and it makes portfolio updates a headache later, I’ve been there). You’ll also start spotting patterns: was the problem a one-time issue, or is it recurring? If it’s the latter, you might be able to work with your managers to address it.
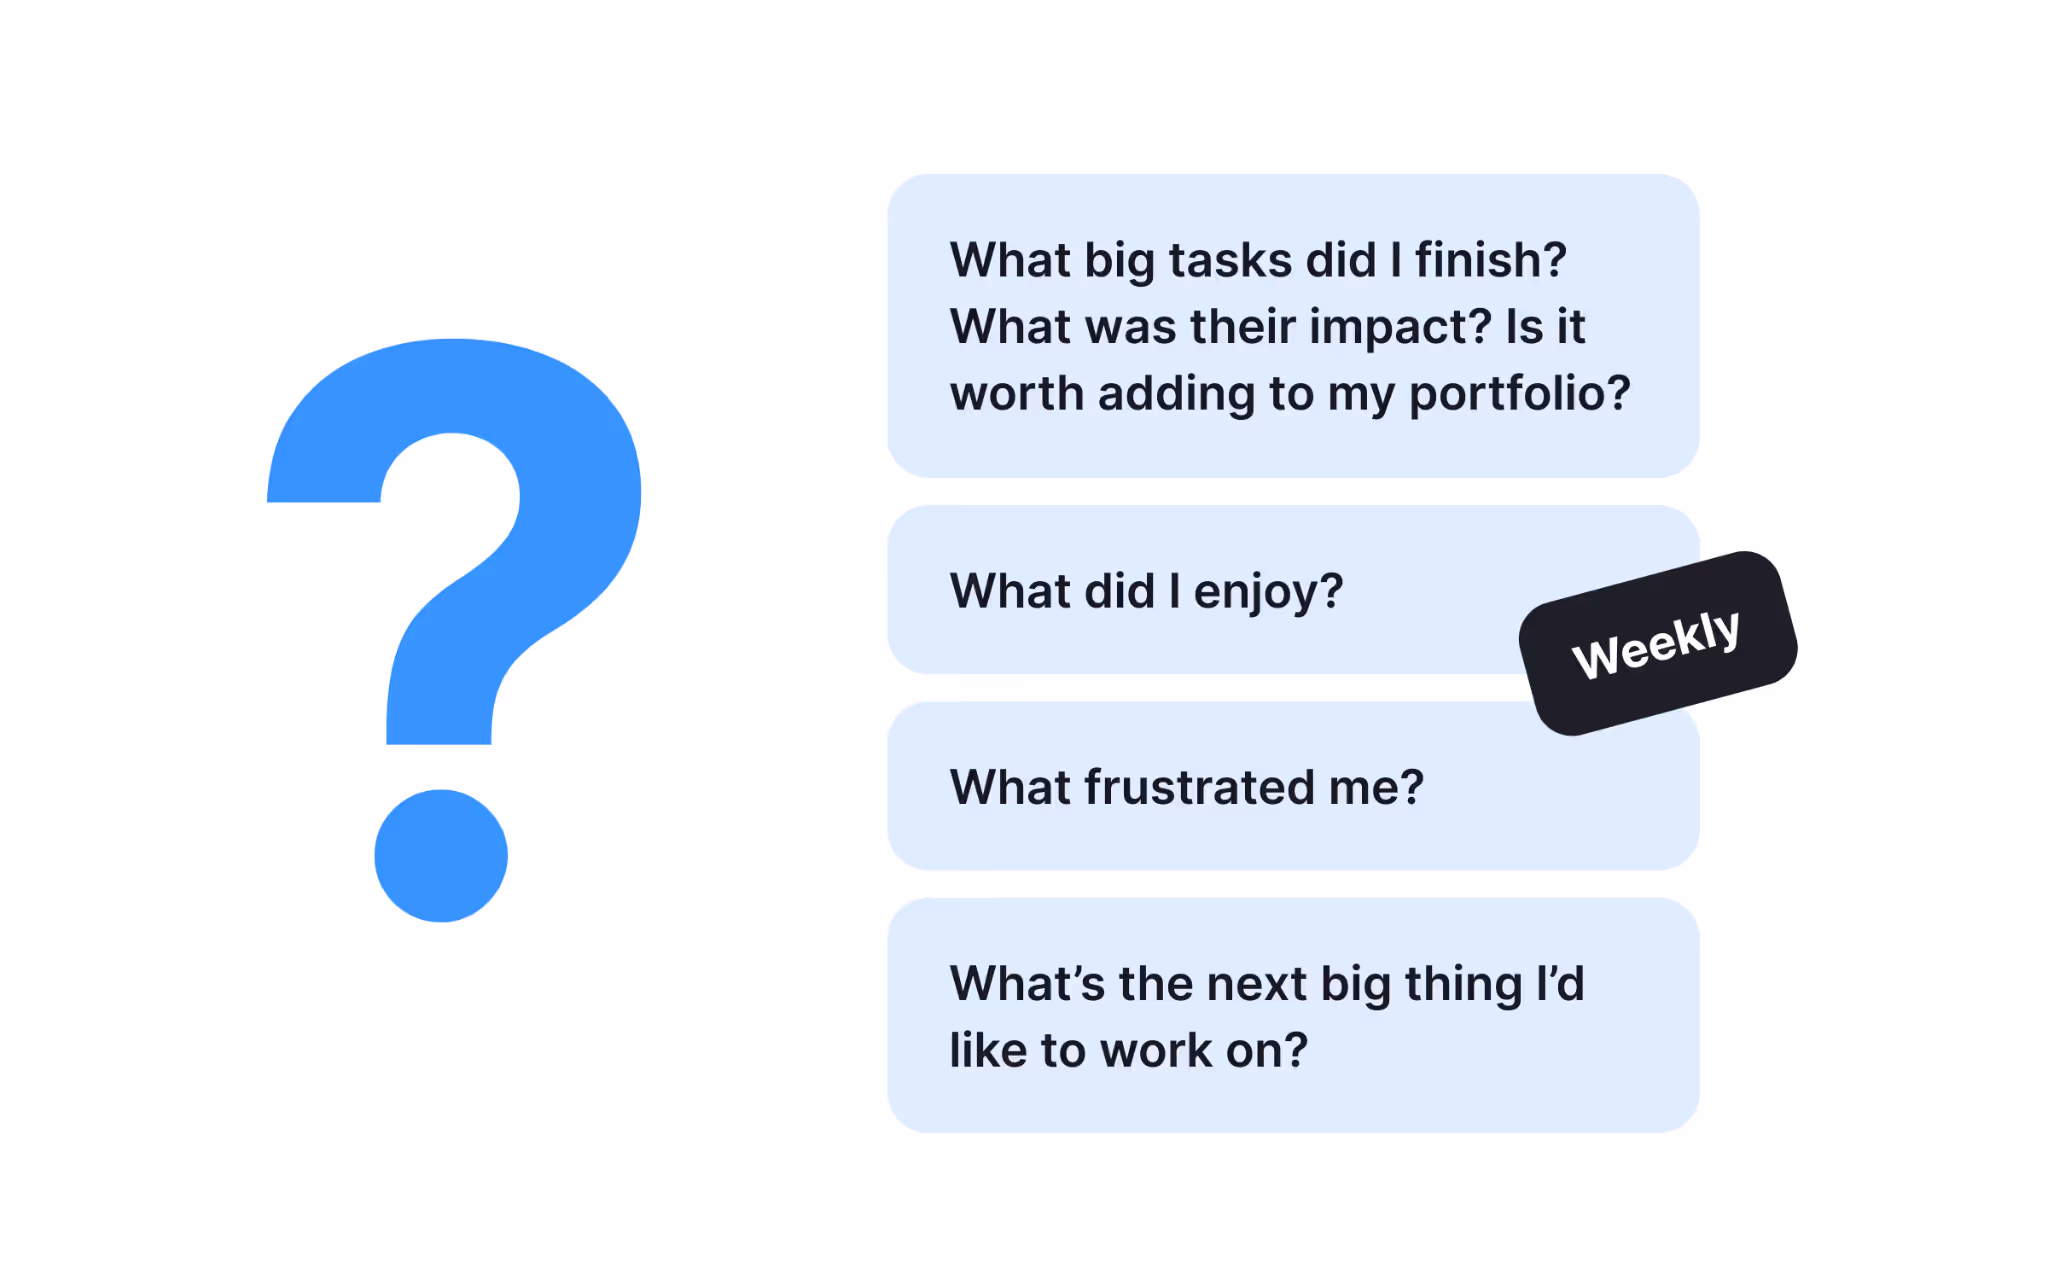
So, at the end of every week (preferably before you reward yourself with a well-deserved Friday beer, hehe), review your daily plans and ask yourself these questions:
- What big tasks did I finish? What was their impact? Is it worth adding to my portfolio?
- What did I enjoy? (This could be a task, communication, event—anything.)
- What frustrated me? (Again, it could be a task, interaction, or situation.)
- What’s the next big thing I’d like to work on?
For example, here’s what I noted after one of my first weeks:
- What big tasks did I finish: downloaded the test app; completed microcopy for a feature X
- What did I enjoy: successfully immersed myself in the user research process and even suggested some hypotheses for the usability test
- What frustrated me: some of the info in the style guides is irrelevant to a UX Writer’s work; too much irrelevant info during the onboarding for tool X
- What’s the next big thing I’d like to work on: propose some updates and refinements to the style guides
From time to time, revisit your notes and reflect on them or add updates. For example, if you completed microcopy for a feature one week and it ships a few weeks later, take a note to check the stats and see how the feature is performing.
In your first weeks, you can treat any task as a “big” one. But as time goes on, if you find you have nothing substantial to add to your list at the end of the week, or it’s filled with only insignificant tasks, it might be a sign that you’re not in the right place.
Milestone: Halfway through trial period
In some companies, managers and HR may conduct mid-probation checks to assess if you’re meeting the role’s requirements and fitting into the team. This is a chance to receive feedback, offer your own, and make adjustments to your onboarding trajectory if needed.
If you have such a meeting, prepare by asking yourself these questions, or at least take the time for a self-assessment:
- What positive moments can you highlight from your work there?
- Are there any situations or tasks where you proved yourself in your work?
- Are there any current challenges where you need support?
Milestone: End of trial period
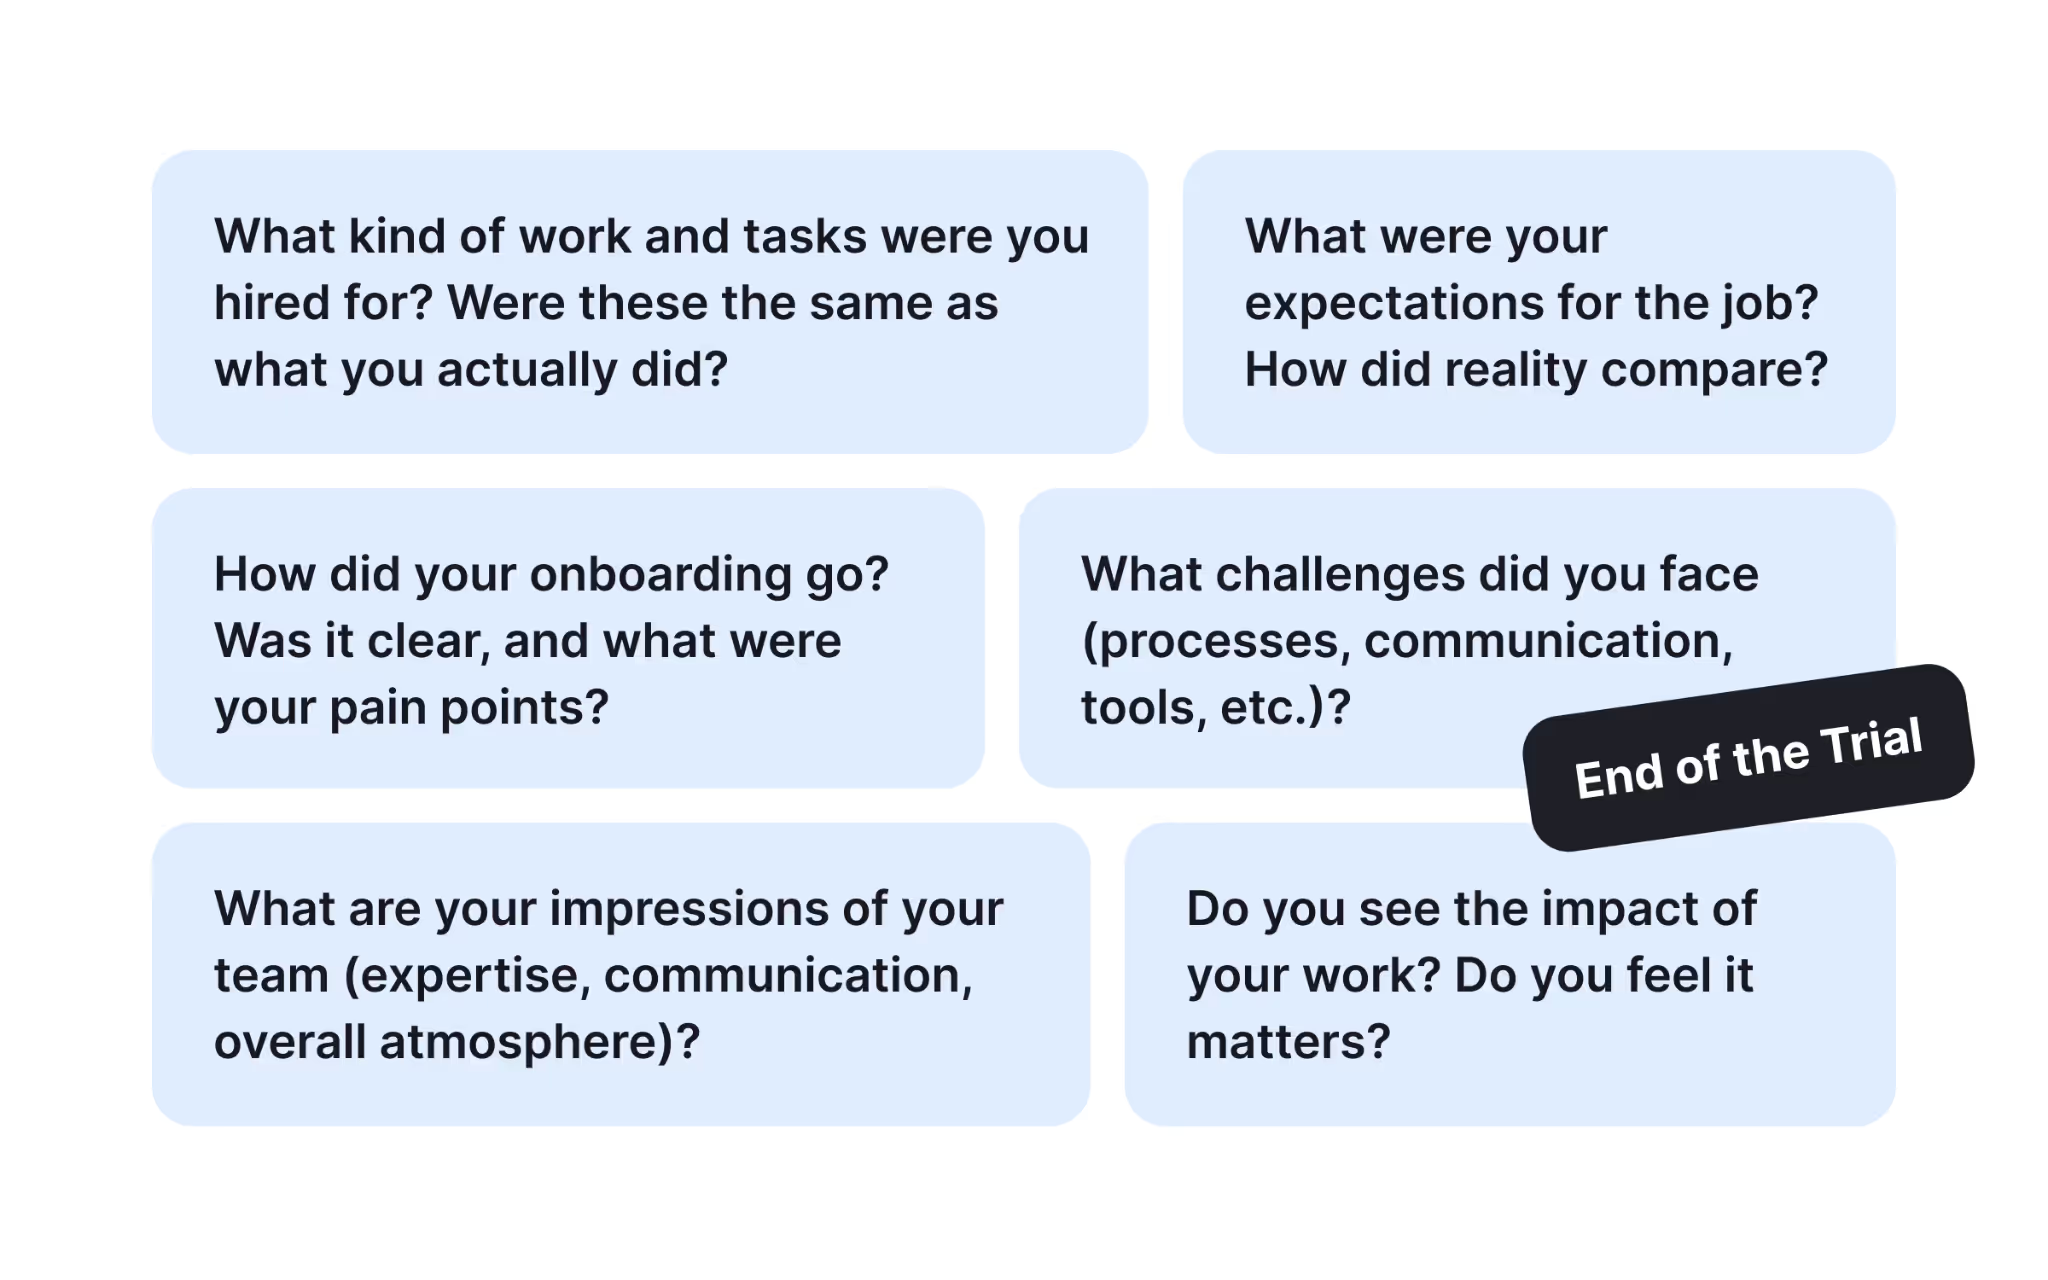
By the end of your trial period, HR and your manager will usually arrange a meeting to discuss how things have been going and whether you’re ready to continue working together. By this point, they’ll provide feedback and gather input from your colleagues. They’ll likely be asked whether your expertise matches the role’s requirements, if you’ve managed to get the hang of things, and if you’re comfortable to work with.
They’ll also ask for your feedback. Remember, the trial period is not just for your employer; it’s for you, too. If they don’t provide specific questions or a survey, here are some things to consider:
- What kind of work and tasks were you hired for? Were these the same as what you actually did?
- What were your expectations for the job (tasks, team, corporate culture, etc.)? How did reality compare?
- How did your onboarding go? Was it clear, and what were your pain points?
- What challenges did you face (processes, tools, communication, etc.)
- Which tasks stood out for you?
- What are your impressions of your team (expertise, communication, overall atmosphere)?
- How do you see your professional and career development in the company? What skills can you develop here?
- What are the next tasks or projects you’d like to work on?
- Do you see the impact of your work? Do you feel it matters?
Wrapping up
I hope this has been helpful for those who’ve just started a new job and are looking to move from surviving to thriving during their first weeks at a new job. Even if you didn’t dive into all this text, you can still use the checklist and self-assessment questions to ensure you’re in the right place and progressing as a professional.